The Work Behind a Hand-Laid Stone Path
A finished stone path tells you very little about how it was made. That is, in some ways, the point. When a path is laid well, what you notice is the stone, the garden, the way the edges sit against the planting. What you do not notice is the 150mm of carefully prepared ground underneath it.
This post is about that part. The work that precedes the first stone. The decisions made at each stage that determine whether the path looks well in thirty years or needs attention in three.
Why the Process Matters More Than the Stone
It is tempting to think of a stone path installation as primarily a question of material. Which stone. What colour. What finish.
Those choices matter. But a path fails from the ground up, not from the surface down. The most considered stone selection, laid on an inadequate base, will shift, settle, crack, and pool water. In Co. Louth’s clay-heavy soil, where the ground expands when wet and contracts as it dries, this is not a hypothetical. It is a predictable outcome whenever the sub-base work is done at insufficient depth or specification.
Understanding the process is the most reliable way to evaluate a quote, ask the right questions, and know whether a price reflects a job being done properly or one being done cheaply.
Stage One: Site Survey
Before any ground is broken, we visit the site.
This is not a formality. We are looking at how water moves across and through the garden, where the clay starts, whether there are roots or services close to the path line, and what gradient needs to be accounted for. We check what the path is connecting, how wide it needs to be, and what the stone will be visible against.
In Co. Louth, we pay particular attention to drainage. A path laid without accounting for water movement will become a channel rather than a surface. We identify where water needs to go at the survey stage, before we commit to a design, not after.
Stage Two: Excavation
The path line is marked out with string lines or spray paint and excavated to depth.
For a natural stone garden path, that depth is typically 150 to 200mm below the proposed finished surface level. This accounts for the sub-base layer, the bedding layer, and the stone itself. The exact depth depends on the stone thickness being used and the ground conditions.
Topsoil is removed in its entirety. Building on topsoil is not suitable for any paved surface. Topsoil compresses unevenly under load, holds moisture, and provides no stable bearing. Where topsoil runs deeper than expected, we continue removing it until we reach firm subsoil or clay.
Any soft spots or disturbed ground are identified at this stage and dealt with before the sub-base goes in.
Stage Three: Sub-Base Preparation
This is the most critical stage of the installation. It is also the stage most commonly compromised in cheaper jobs.
We lay a minimum 100mm of MOT Type 1 compacted aggregate as the sub-base. MOT Type 1 is crushed stone graded from coarse particles down to fine dust. When compacted, those varied particle sizes interlock and form a dense, stable layer that distributes load evenly and resists the movement that clay soil exerts on whatever sits above it.
The aggregate is laid in passes and compacted using a vibrating plate compactor. We check for level and fall at this stage. Every path we install has a minimum fall of 1:60 away from any building or structure. This is designed in at sub-base level so it is carried through the finished surface.
A path laid on an under-specified sub-base will show the ground’s movement within a few years. This is why the sub-base specification is the first question worth asking any installer quoting for your path.
Stage Four: Bedding Layer
On top of the compacted sub-base goes the bedding layer into which the stone is set.
For most natural stone path installations in Co. Louth, we use a semi-dry mortar bed mixed at a ratio of four parts sharp sand to one part cement. The mortar is spread to a consistent depth and screeded level, accounting for the fall already set in the sub-base.
The bedding layer does two things: it provides a consistent surface for the stone to settle onto, and the cement content means it cures and locks the stone in place. A sand-only bed can work on certain projects, but in Irish ground conditions the mortar bed gives a more durable long-term result.
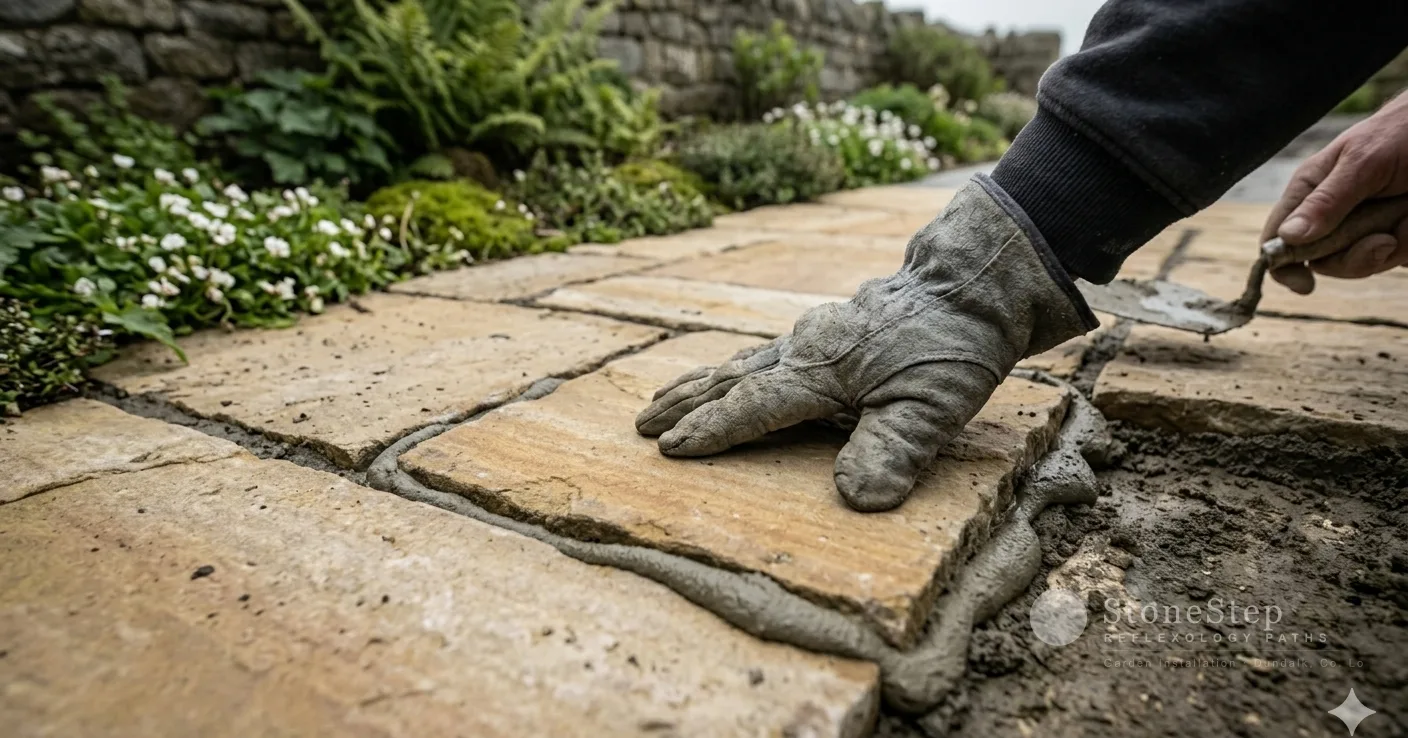
Stage Five: Stone Laying
With the bedding layer prepared, the stone goes in.
Each slab or piece is placed individually. We check the level and fall of each stone relative to its neighbours and to the overall path direction before it is pressed into the mortar bed. A stone that is out of level by a few millimetres will rock. A stone that does not follow the path’s fall will hold water. Both are avoidable with patience at this stage.
Cuts are made with a wet-cutting disc saw. This produces a clean, controlled edge without shattering. For curved path edges or cuts around planting beds, the wet saw allows tight, accurate shapes that a dry-cut angle grinder cannot reliably produce.
We work from one end of the path to the other, checking alignment as we go. The spacing between stones is kept consistent to prepare for jointing. The finished surface is walked during laying to check for any rocking stones before the mortar sets.
Stage Six: Jointing
Once the bedding mortar has cured, typically 24 to 48 hours, the joints between stones are filled.
We use either a traditional sand and cement pointing mix or a polymeric jointing compound depending on the project. Polymeric jointing compound activates and binds when wetted, sets firm, resists weed germination, and has a cleaner appearance in tight joints. For most residential paths we recommend it.
The jointing compound is worked into the joints with a pointing tool and then cleaned off the face of the stone with a damp sponge before it fully sets. Good jointing is part of the finish of the path and repays careful work.
Stage Seven: Handover
We clean the site, take away any waste material, and walk you through the path before we leave.
This includes: the curing period before the path should be used (48 to 72 hours for light foot traffic, five to seven days before any loading); what to clean the path with; whether and when to seal the stone; and what to look for in the first winter.
A naturally stone path should need very little attention in its first years. The jointing may settle slightly and benefit from a top-up of polymeric sand after the first winter. If that is needed, it takes twenty minutes.
What This Process Produces
A path built to this specification on a sound sub-base will settle into its surroundings over the first two seasons and then hold. The stone weathers. The edges acquire a quality that was not there on day one. In thirty years, it will look like a path that belongs where it is.
If you are planning a stone path installation in Dundalk or across Co. Louth and want to understand what the process involves before we visit, see our stone path installation service. For cost guidance, see our stone path cost guide.
Frequently Asked Questions
How long does a stone path installation take from start to finish? A standard garden path of 10 to 15 metres takes two to three days on site: one day for excavation and sub-base, one day for bedding and stone laying, with a further half day for jointing once the bed has cured. Add the curing period before use and the total elapsed time from start to walkable is typically four to five days.
Does the sub-base need to be different for different stone types? The sub-base specification is the same for all natural stone: 100mm minimum compacted MOT Type 1. What varies slightly is the bedding layer and the stone thickness. Thicker stones like 40mm granite need a deeper bedding layer than thinner 20mm sandstone. We adjust the bedding depth at each project to suit the stone being used.
Can a stone path be laid in wet weather? Excavation and sub-base work can proceed in most wet conditions. We do not lay mortar in heavy rain, as this dilutes the mix, or in temperatures below 3°C overnight, as frost will damage the cure. Mild, overcast conditions are ideal. Irish spring and autumn weather suits stone path installation well.
Why do some paths need repointing after the first winter? Thermal movement and the stone settling onto the mortar bed through its first winter can open small gaps in the jointing, particularly in longer paths with tight joints. This is normal and not a sign of a structural problem. A light repoint or a brush-in of polymeric jointing sand in spring addresses it quickly.
Have a question about your garden?